Sunday, December 16, 2018

Crochet- Percian tiles Eastern jewels blanket

Remember I said I'd taken up crochet?

Well, with my usual bull in a china shop bravado, I decided that since I'd made a couple of fairly simple stiped blankets using mainly 1 stitch... I could make the really complicated looking blanket I kept seeing online.

Persian Tiles - Eastern Jewels

Not too tricky, right? It's Janie Crow's Persian Tiles blanket in the Eastern Jewels colourway. It's  here if you want to know more. I bought it as a kit, and just needed to add a couple of hooks to get going. I'm in love with it, but you may be seeing a few more posts about it, as I think it's going to take e a while.


My pretties!

Thanks for looking.


Saturday, December 15, 2018

Card- Happy 50th


My lovely colleague at work celebrated a special birthday recently, so I volunteered to make the card that everyone signed.


Loving those pearly holographic letters, so muc that I went for some matching punched swirls and lots of gems.


The image I've used before, it's a stamp that I watercoloured using pencils.


It went down a storm!

T

Friday, December 14, 2018

Crochet- Hattie's birthday blanket

You know that I haven't spent a huge amount of time at my desk recently (but that's going to change!), but that doesn't mean I haven't been crafting. I've discovered crochet. Late to the party, that's me... I started off with a couple of fairly plain stripy blankets, and received a request from my girl for her own. Of course I obliged.


I went for a variation on the Cosy Stripe Blanket from the fabulous Attic 24 blog.


It's a bit mind bending when you see it all together. The colours are very bright. It's such an easy patter pretty much all double crochet, but very cleverly it makes a lace like pattern.


I made it with heavy cotton yarn, and it took a few weeks. I was particularly pleased with the edge- it looks kinda like broderie anglaise I think.


Anyway, she loved it, and she's used it every day since her birthday- or I have, it's so heavy it feels lovely to snuggle under.


Thanks for looking!

Thursday, December 13, 2018

Birthday girl

I have a teenage girl in the house. It's cliche I know, but I'm very aware of time flying past right now. I'm in Mom denial of it all...

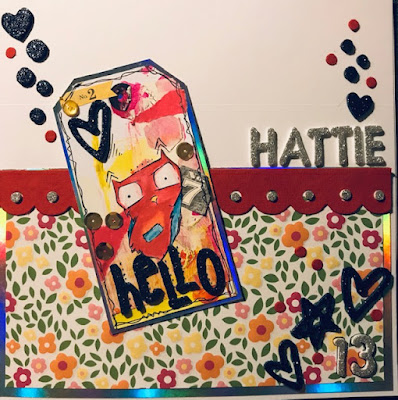
A Happy 13th card was in order. I used one of the little tags I'd made earlier in the summer. I'd deliberately kept them back to use on cards. Making a few in advance really makes life easier.


My girl loves bright and cheerful- she's not a pink and girly girl, so I wanted something fot for my shiny new teenager.


I went for a flowery paper, and then lots of 3D glittery foan stickers (I think they're Thickers). 


I love this brdie with attitude. I made this and some other tags a while ago- take a look here for more...


I'm a fan of doodling edges in black pen- it adds definition and a bit of style. I added dots nad chevrons and allsorts to this one.

Thanks for looking!

Wednesday, December 12, 2018

Christmas wallets

So. It's not a New Year's resolution, cos it's ain't the new year yet, but I do want to post more regularly. Life gets in the way sometimes, and I've been super busy with my new fabulous job. However, I'm settled and happy, and don't need to devote all my brain cells to the day job now, so yay! More crafting!

Let's start with a seasonal offering. I've bought some vouchers and tickets this year as gifts and I decided to resurrect these little wallets I've made in previous years.


The small one is made from a sheet of A4 card, and the larger ones from a 12x12" sheet. Lots of added Christmassy paper offcuts- I've used some from an American Crafts vintage range.


I cut them a bit bigger than the vouchers/tickets, and included a little tab to secure the fold. I scored on both sides before folding, it really does make the folds crisp. Ha ha, I think I'm hungry, I just typed crisps 3 times.... 


My measurements are pretty loose, but around  4 1/2 inches and along the long side, and then an inch for the fold tab on the short side. After I'd scored I cut away along the score line to leave the tab. Secure the tab with DST. I then cut a strip for the band and scored about 1/8 inch wider than the folds on the wallet so that it'd sip on and off easily. 


I decorated front and back and inside with co-ordinating paper an embellishments. I've deliberated kept mine quite flat, but they'd look great with some 3D elements.


The little band keeps it all clsoed and slips off- I'm not sure if I want to decorate inside a bit more- it looks a tad bare, but then I haven't written in them yet. I didn't want to give away who they're for!


Hurray! I'm a Christmas freak so this makes me happy! JIngle bells xxx