Sunday, December 16, 2018

Crochet- Percian tiles Eastern jewels blanket

Remember I said I'd taken up crochet?

Well, with my usual bull in a china shop bravado, I decided that since I'd made a couple of fairly simple stiped blankets using mainly 1 stitch... I could make the really complicated looking blanket I kept seeing online.

Persian Tiles - Eastern Jewels

Not too tricky, right? It's Janie Crow's Persian Tiles blanket in the Eastern Jewels colourway. It's  here if you want to know more. I bought it as a kit, and just needed to add a couple of hooks to get going. I'm in love with it, but you may be seeing a few more posts about it, as I think it's going to take e a while.


My pretties!

Thanks for looking.


Saturday, December 15, 2018

Card- Happy 50th


My lovely colleague at work celebrated a special birthday recently, so I volunteered to make the card that everyone signed.


Loving those pearly holographic letters, so muc that I went for some matching punched swirls and lots of gems.


The image I've used before, it's a stamp that I watercoloured using pencils.


It went down a storm!

T

Friday, December 14, 2018

Crochet- Hattie's birthday blanket

You know that I haven't spent a huge amount of time at my desk recently (but that's going to change!), but that doesn't mean I haven't been crafting. I've discovered crochet. Late to the party, that's me... I started off with a couple of fairly plain stripy blankets, and received a request from my girl for her own. Of course I obliged.


I went for a variation on the Cosy Stripe Blanket from the fabulous Attic 24 blog.


It's a bit mind bending when you see it all together. The colours are very bright. It's such an easy patter pretty much all double crochet, but very cleverly it makes a lace like pattern.


I made it with heavy cotton yarn, and it took a few weeks. I was particularly pleased with the edge- it looks kinda like broderie anglaise I think.


Anyway, she loved it, and she's used it every day since her birthday- or I have, it's so heavy it feels lovely to snuggle under.


Thanks for looking!

Thursday, December 13, 2018

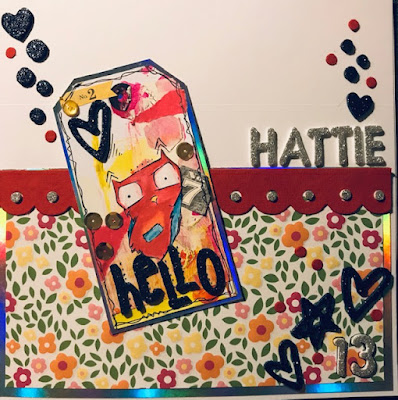
Birthday girl

I have a teenage girl in the house. It's cliche I know, but I'm very aware of time flying past right now. I'm in Mom denial of it all...

A Happy 13th card was in order. I used one of the little tags I'd made earlier in the summer. I'd deliberately kept them back to use on cards. Making a few in advance really makes life easier.


My girl loves bright and cheerful- she's not a pink and girly girl, so I wanted something fot for my shiny new teenager.


I went for a flowery paper, and then lots of 3D glittery foan stickers (I think they're Thickers). 


I love this brdie with attitude. I made this and some other tags a while ago- take a look here for more...


I'm a fan of doodling edges in black pen- it adds definition and a bit of style. I added dots nad chevrons and allsorts to this one.

Thanks for looking!

Wednesday, December 12, 2018

Christmas wallets

So. It's not a New Year's resolution, cos it's ain't the new year yet, but I do want to post more regularly. Life gets in the way sometimes, and I've been super busy with my new fabulous job. However, I'm settled and happy, and don't need to devote all my brain cells to the day job now, so yay! More crafting!

Let's start with a seasonal offering. I've bought some vouchers and tickets this year as gifts and I decided to resurrect these little wallets I've made in previous years.


The small one is made from a sheet of A4 card, and the larger ones from a 12x12" sheet. Lots of added Christmassy paper offcuts- I've used some from an American Crafts vintage range.


I cut them a bit bigger than the vouchers/tickets, and included a little tab to secure the fold. I scored on both sides before folding, it really does make the folds crisp. Ha ha, I think I'm hungry, I just typed crisps 3 times.... 


My measurements are pretty loose, but around  4 1/2 inches and along the long side, and then an inch for the fold tab on the short side. After I'd scored I cut away along the score line to leave the tab. Secure the tab with DST. I then cut a strip for the band and scored about 1/8 inch wider than the folds on the wallet so that it'd sip on and off easily. 


I decorated front and back and inside with co-ordinating paper an embellishments. I've deliberated kept mine quite flat, but they'd look great with some 3D elements.


The little band keeps it all clsoed and slips off- I'm not sure if I want to decorate inside a bit more- it looks a tad bare, but then I haven't written in them yet. I didn't want to give away who they're for!


Hurray! I'm a Christmas freak so this makes me happy! JIngle bells xxx

Tuesday, July 17, 2018

Tags- Fly and be free and Hello


Remember the tags I posted about a couple of days ago? Well I thought I'd show you the other two today.


Here's all 3 together. I'd used a white tag, patterned paper and paint scraped over and though a stencil, toned down with some white gesso.


This one ended up with a butterfly theme, so Fly and be free seemed to be appropriate. I added sequins and some old stickers and the dew drops I found in a drawer last week!


As always I outlined lots in black ink.


My angry owl has been hanging around on my desk for months, and he seemed to be saying hello. 


After I'd outlined in black ink, he needed a bit more so some dots and squiggles round the letters and the owl happened. I'm really pleased with these, so next to work out how to use them!


Saturday, July 14, 2018

Tags- Hello lovely.


I made tags! Just for the hell of it. I started off with no idea what I was going to use them for, but as I went along some themes emerged! I really enjoyed making them, just because.


The base are white tags, with scraps of patterned paper stuck on. Then I went over the top with scrapes of pink and yellow paint. It was a little bright, so I tones it down with white gesso.


I use an old credit card to scrape the paint on, and a brush to paint through a hexagonal stencil.


The diecuts came from various sets, I just went for colour matches. Plus sequins, some words, and dew drops.


I went for a cake theme with this one. I thought it might work on a layout for an afternoon tea I recently went to. I added number and other odd stickers from an old set, again, just looking for colours.


I finished off with doodles in black ink to edge and finish off these 2 tags. 

Thursday, June 21, 2018

Thank you......again


A final little card to show you from the pile of books stamp session.


It's a simple little thank you, with the words repeatedly stamped at the bottom of the page, and a pale pink script in the background. 

And that's it for the makes from the one stamping session, I think I did quite well from the one outing of the stamp!

Thanks for looking.

Monday, June 18, 2018

Summer hello- Traveller's notebook


Oh how I love my traveller's notebook. For some reason I hadn't thought of making a double page layout before I spotted a few other people doing them on YouTube and Pinterest.


We'd gone away for the weekend, and as I'm always up early I set myself up in a corner with the few supplies I'd brought from home and made this page. The photo is of my brother and myself when we were on holiday as children.


The paperstack was an impulse purchase (and cheap), and an equally impulse decision to take it away with me. It's got lots of flamingos and pineapples and is very now...


I found my date stamps, so I went a bit mad on this one.


There's no doubt that black outlining helps makes things pop and brings it together. The stickers are from the Simple Stories I am range, and they're mostly quite small but that works well for the TN sized pages.


It's good to work with a limited set of materials, it makes decisions easier and focusses the mind! I love how the bright pink washi works with the flamingos.

Thanks for looking!


Sunday, June 17, 2018

Bookmark cards


Following on from my little stamping session with a Unity book stamp, I made some pretty bookmarks. I'd stamped the books onto brown paper, and cut out, then matted onto various orange cards and papers. I added the quote from the stamp set too. 


I have oodles of ribbon and fibres, and so I matched up the blue in the patterned layer, otherwise it was orange overload.


I'd had plans for some more thank you cards, but the bookmarks sparked a little idea.


The patterned paper is layered onto kraft card, with some old Martha Stewart punches brought into use again. 


The library pockets are from a fab set I was brought when I left my old job- it was to make your own library. Great aren't they?


As these are cards for people who work in a library, the book theme seemed appropriate! 


Gems always finish things off!


Thanks for looking!