Monday, February 11, 2019

You're awesome


This was one of those got to get my Lavinia stamps out times. I'd got the idea for a card with a watercolour inked heart in the background.


I cut a stencil and dipped the heart gap into a mix of Distress Ink and water. I added the smudges of yellow round the edges for definition.


The grass stamps at the bottom are Stampin' Up, much used, much loved.


I added Glamour Dust for sparkle, and tehn for good measure made a bookmark to match.


Thanks for looking!

Friday, February 8, 2019

Missing octagon!

Today I laid out all of the octagons for my Persian tiles blanket. I was so excited to see what it all looked like together. Imagine my horror- there's an octagon missing!!!


Still....it looks good though, right?

Off to make that other octagon..

Wednesday, January 16, 2019

Tag me in

Sometimes I spot something that I have to use. I had my car serviced last week, and they always tie a little tag onto my keycard with my registration number to identify it. I love tags like this, something to reuse!


Whilst I was on my stencil and doodle blow out I made this little doozy. (See my last few posts for details).


Looks nice mounted onto black card. This might end up as a bookmark, or maybe on a layout, we'll see!


Thanks for looking!

Monday, January 14, 2019

Continuing the theme....

In yesterday's post I told you how I'd used up some excess ink on a sheet of white card.


It was really pretty, so obviousy I decided to put stuff all over it...


I sponged through stencils using Distress Inks, and stamped scribbled circles and stars.


As I've been doing on several projects recently I then outlined the stencils in black ink. It turns the spots into seed heads, and gives the stencils a direction.


 Spots and swishes of white ink pen help things to pop out.


It needed smething else so I added black stars around the paler stamped stars.


Kinda loving how this turned out. No idea how I'm going to use it yet, I'm thinking an accent on a scrapbook page and possibly a couple of cards.


Thanks for looking!

Sunday, January 13, 2019

My word of the year. Part 2.

Yesterday's post introuced my word of the year- kind.


Deciding on one word was tough! I went through a few. I was almost there with commit, but kind won. I feel that I'm already kind to others, but I forget to be kind to myself. So this year I'm deterined to be kind to me. That might mean allowing myself some me-time every now and then, or it might be being kinder to myself when I make a mistake. I need to commit to being healthier, but committing is a symptom of my decision to be kinder to myself.


I'd made the planner inset above so that I'd see it daily, but I also wanted to document how the I'd come to the word. I went for a travelers notebook page. I love, love, love working on those little pages!


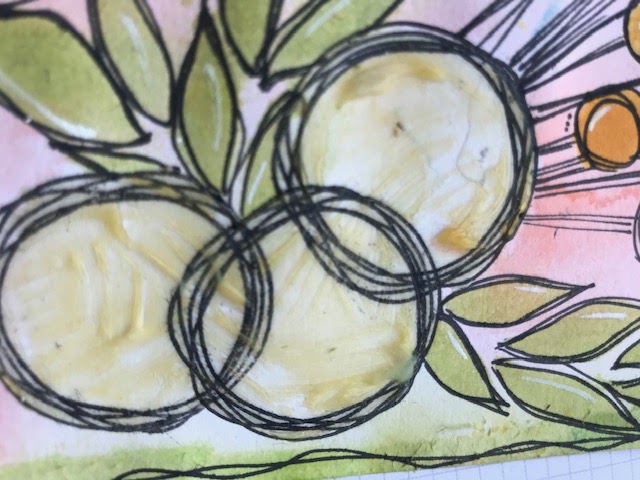
I started by stamping the scribbled circles from this month's Lollipop Box Club kit and masking them off with amsking fluid (stinky!).


Colour came from a swoosh or two of distress ink on a non-stick mat, spritzed with water and then dunked onto my pages. Then it's the killer wait for it to dry, horrid when you're on a creative roll. I put mine on the radiator, it's a bit warped, but it'll flatten out with time.


Can't waste the excess ink, so I splooshed it onto some white card. 


I sponged ink through the feather stencil from the Lollipop Box and outlined them to make leaves and dreamcatcher feathers.


ANd finally I was ready for my word....and all the other words I'd considered. I just wrote them all on there!


I like that the white rings are the only clear space on the pages, it's busy, but there's a few little spots of white for the eye to rest on.


 I had a little helper..... Min the kitten.


Thanks for looking!

Saturday, January 12, 2019

My word of the year, part 1.

So... inspired by Lisa from Lollipop Box Club I've finally decided on my word of the year. It's taken a while to decide. I created a background for my word last weekend, with watercolour paper, stamps and a stencil from January's LBC.


The paper is washed with watercolours, I'd covered the stamped circles with masking fluid so I'd keep the circles pristine.. It's a useful teachnique, even if the fluid has a strong smell.


I sponged through the leaf stencil and used a stray bit of punched card with holes in it to sponge some circles. I used Distress Inks and tried to vary the depth of colour to give a watercolour effect.


Out came my trust black pen for some outlining- quite roughly done, I didn't want it to be pristine.


Rubbing off the masking fluid is very satisfying- kinds like peeling glue off your fingers when you were a kid (or a big kid, I still do it...).


Then I had to decide on my work for the year....I really should have gone for decisive, but seeing as I'm not, I chose KIND. tomorrow's post will have more about how I chose it.


This one is to go in my planner, so that I see it everyday. I've mounted it onto black card ready to be hole punched.


Thanks for looking!


Friday, January 4, 2019

Planner stickers- I've got this!

Ooh I love making things! I haven't been inky in ages, and I loved getting into properly making stuff yesterday.

I have had a Lollipop Box Club box over Christmas and I wanted to use some of the gorgeousness, but I'm always a bit tentative when it comes to diving in and using new goodies. I have to overcome my squirrelling away tendencies slowly...

So, I used some of the paper, the sweet little stamp set of stars and scribbled circle, and the feather/leaf stencil. I plan in a classic Happy Planner, and although I have bought stickers specifically for it, I quite like the idea of making things that are personal to me. So, I made some "stickers" for next week.


I started off with a 5x3inch piece of pale blue paper, enough o make 4.5x2.5 inch blocks. I stencilled with Tumbled Glass Distress Ink, and stamped with yellow and pink Impress inks. It looked like this-


I then cut it into 4 blocks and added stickers from the LBC box, some offset at an angle, and another one cut down into single words- fiddly but I do love some words on things I create.


My black and white pens came out- doodling round the edges, and round the stickers.


A top tip is to use white pen to make things pop. I love my Posca pen, and the white dots on the stars make them shine!


Finally- here's how it looks in my planner. I'm not one for oodles of decoration, but I love how these look. 


Thanks for looking!